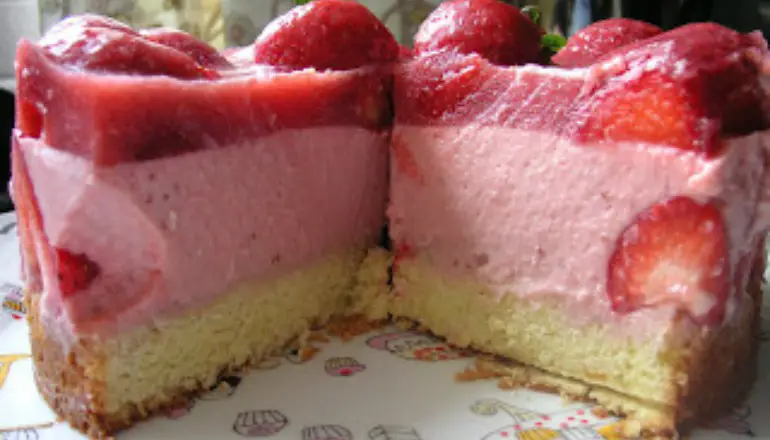
This cake looks so pretty! I like to add some pink shimmery sprinkles for an even prettier effect. I will also let you in on another fun thing that I like to garnish this cake with. More strawberries of course, but this time I like to add chocolate dipped strawberries! A few on the top and a few around the cake on the base. This really makes this cake go from wow to WHOA! The taste of this cake is out of this world. I mean, who doesn’t love luscious strawberries. The mousse on this cake is everything and then some! This is definitely a cake that will impress your family and friends.
Check out what our friends from The Caked Crusader have to say about this:
“I see this as a dessert cake; a slice of elegance to conclude a lovely lunch or dinner.”
What a beautiful and delicious dessert! Perfect to serve after any meal!
Ingredients
For the sponge base:
1 cup Land O Lakes unsalted butter
1 cup casterc sugar
2 eggs
1 cup Gold Medal self raising flour
2 tablespoons Tru Moo milk
For the mousse:
2 1/4 cup strawberries, hulled and washed
4 tablespoons icing sugar
5 gelatine leaves (if you want to use powdered gelatine this equates to 4 1/2 tablespoons of boiling water)
1 1/4 cups whipping cream
3 tablespoons icing sugar
Optional: Additional strawberries to set in the mousse
For the topping:
1 cup strawberries, hulled and washed, plus additional whole strawberries for decoration
1-2 tablespoons icing sugar
3 leaves gelatine ( 3 tablespoons boiling water)
Instructions
– Preheat the oven to 375°F.
– Grease one 20cm loose bottomed sandwich tin.
– First make the sponge base. Beat together the butter and sugar until pale and fluffy.
– Beat in the eggs, flour and milk and ensure all the ingredients are well combined.
– Spoon into the sandwich tin and level the surface.
– Bake for approximately 25 minutes or until a skewer comes out cleanly. Mine took about 23 minutes.
– Leave the sponge to cool in the tin on a wire rack.
– When it is cool, use a knife or wire to cut the “dome” off the sponge as you need a nice flat surface for the mousse to sit on. I cut mine so I had a sponge disc that was 2cm tall.
– Sit the sponge disc on a plate and place a 20cm patissiere’s ring over it. I used this because it was much deeper than a cake tin. If you don’t have a 9cm tall patissiere’s ring then use a 20cm springform tin (without the base) and build up the height using foil or baking paper. However you achieve it, what you’re aiming for is the sponge sitting very snugly at that bottom of a 20cm ring with 9cm depth.
– Now make the mousse: Puree the strawberries (I used my food processor to do this) and place in a saucepan along with the icing sugar.
– Soak the gelatine leaves in a bowl of cold water for 4-5 minutes.
– Heat the puree and icing sugar until it just reaches boiling point. Taste, to ensure it is sweet enough. If it isn’t, add icing sugar to taste. Leave to cool slightly.
– When the puree is cooler (but still warm) squeeze out any water from the gelatine leaves and stir into the puree ensuring all the gelatine has been fully integrated. Put to one side.
– Whip the cream and icing sugar until the soft peak stage.
– Stir the cooled strawberry puree mix into the cream. Don’t panic that it looks very runny!
– If you choose to, cut some strawberries in half and sit them up on the sponge base so the cut side is pressed against the metal ring. This looks pretty when you come to serve it.
– Pour the mousse gently over the sponge base, taking care not to disturb the halved strawberries (if using).
– Refrigerate until set – at least 2 hours.
– When the mousse is set, you can make the topping. Puree the strawberries and stir in the icing sugar.
– Soak the gelatine leaves in cold water for 4-5 minutes.
– Heat the puree. Squeeze the water from the gelatine leaves before stirring into the warm puree.
– Place some strawberries on top of the set mousse, then pour the puree topping over.
– Refrigerate until ready to serve.
– Bask in glory at the wonderful thing you have made.
– Eat.
USE RED NEXT PAGE LINK BELOW
Quick Tip: Serve with a dollop of whipped cream on top!
Thanks again to The Caked Crusader for this amazing recipe.